logo

logo

Friday, August 31, 2012

Banana Split Cakes!


Good morning!  Happy Friday!  I know that I had posted pictures of Paisley’s birthday party a couple of weeks ago….but yesterday was her real birthday.  We had her party a couple of weeks early so we could fit it in with the Olympics.  Yesterday, she turned five.  I can’t believe my baby is five…..mostly because I still haven’t lost all of my “baby” weight, and I am slowly realizing that I can’t call it baby weight when my baby is five.

I, of course, wanted to make Paisley’s birthday cake, and Paisley, of course, wanted me to buy one.  Not because she doesn’t like my food, but she loves store bought ice cream cakes.  Who doesn’t?  But I won this battle.  She loves banana splits, so I talked her into banana split cakes.  Today I am going to show you how I made her super cute individual banana split cakes.  She loved it, and I am pretty sure you will too.

Here is a sneak peak:


Who doesn’t love food in jars??

A banana split is essentially, chocolate ice cream, strawberry ice cream and vanilla ice cream sitting atop sliced bananas.  The ice cream is topped with strawberry sauce, pineapple sauce and hot fudge.  Then, the whole thing gets topped with whipped cream and a cherry.  Whew.  That’s a lot.

I tried to stuff every component (without using ice cream) into a tiny jar.  I think I succeeded.  Let me show you.


I used bananas, pound cake, strawberry sauce, hot fudge, whipped cream and maraschino cherries.  Yes, that is all store bought.  This cake is more about assembling then cooking….with the exception of my pineapple sauce….I did make that.

For the pineapple sauce, I used brown sugar, butter and crushed pineapple.

You can feel free to make any part of this cake yourself (homemade).  You can even make all of it from scratch, if you have that kind of time.  I was making this for a 5 year old…..she doesn’t care if it is from scratch or not.  Remember, she wanted a SpongeBob ice cream cake from Wal-Mart.


To make the pineapple sauce, I started by melting butter in a skillet.


Then, I whisked in brown sugar.  This will make a yummy caramel.

I let this cook for a couple of minutes to get all thick and caramely.


Finally, I stirred in my pineapple.  I let this boil away for five minutes until it was super thick.

Once this was done, I popped it in the fridge to cool off.  I don’t want to add hot pineapple sauce to my cake….

As for the cake….


I sliced my pound cake, lengthwise, into 3 pieces.  This will help me cut out as many circles as possible.  I am maximizing my pound cake.

It is fine if your cake is still frozen.  As long as you can cut it, it is fine.  These cakes go into the fridge anyway, so cold if good.


I used a cookie cutter that is just slightly smaller than the diameter of the jars I am using.  BTW-I am using half pint canning jars.  These are easily found at Wal-Mart or a hardware store.

You can also just trace around your jar bottoms.


The first layer of the cake is banana.  I sliced my banana and sprinkled it with lemon juice to keep it from browning.


What you see here is banana, a slice of pound cake, strawberry sauce, and another slice of pound cake.


Then, the chilled pineapple sauce.


And another slice of cake.  I used a slice from the top layer of the cake to make it look more finished.


Before I screwed the lids on and popped these bad boys in the fridge, I dolloped on some fudge.

I let these chill in the fridge for about 2 hours.  This will help everything “set”.  It also lets the sauces soak into the pound cake and make them extra yummy.


When I was ready to serve, I topped the whole thing with whipped cream and a cherry.  These are the cutest things ever!

How much do you want one right now?

Because they are already individual servings, they are perfect for a birthday or any other kind of party!  Everyone gets their own jar!


Peepers loved it!


She forgot all about a store bought cake!

If you love all the flavors of a banana split, like Paisley does, this cake is a must make.  You can suit it to your tastes too…..mix it up! 

Here is the recipe for the pineapple sauce…..

Pineapple Sauce

2 tablespoons butter

3 tablespoons brown sugar

8 ounces crushed pineapple

Melt butter in a skillet over medium heat.  Whisk in brown sugar and continue cooking over medium heat until this thickens, about 3 minutes.

Whisk in pineapple and let mixture boil over medium heat until mixture is thick, about 5 minutes.

Chill pineapple sauce in refrigerator.

Makes enough for 6 banana split cakes.

Tuesday, August 28, 2012

Breakfast Empanadas and a PB&J Smoothie!


Hi friends!

First off, some exciting news….Gourmet Rooster will be introducing five new products over the next couple of weeks.  The labels are being printed as we speak, and they will go into production at the end of this week.  Once I receive the products, I just need to take their pictures and have them added to my website.  So yeah, a couple of weeks;)  The five new products are Strawberry Champagne Spread, Cherry Amaretto Spread, Grandma’s Celery Seed Dressing, Strawberry Balsamic Dressing (fat free!) and finally….Spicy Lime Catsup!  I am so freakin’ excited!  I can’t wait for you guys to try all of them!  I will totally run a special for all of my FB friends.

So Addy is back to school, as of yesterday.  Paisley starts Tuesday.  Do you have trouble feeding your little lovelies in the morning?  My girls don’t even start school until 9:30, so it isn’t like they have to get up at the crack of dawn…yet I still struggle to get food in them in the am.  Addy prefers a hot meal, diva that she is, and Peepers is happy with a smoothie.  Today, I am going to show you a quick and easy Breakfast Empanada that can made on the weekends and re-heated on weekday mornings and a PB&J Smoothie that Paisley loves.  Let’s start with the smoothie.

This smoothie is protein packed.  Paisley is a lot like me and needs protein to get her through the day.  This smoothie is jam packed with Greek yogurt and peanut butter which are both kick-ass sources of protein.


I used a 5.3 ounce of light, non-fat Greek yogurt, vanilla flavored.  I also used reduced fat peanut butter and strawberry jelly.


In my Magic Bullet, I have ½ a cup of 1% milk and ¾ a cup of crushed ice.

This smoothie will make enough for one adult or two wee ones……


I scooped my yogurt into the bullet, right on top of the ice and milk.  Then, I added 2 tablespoons of peanut butter.  A banana would be amazing in this, but Paisley prefers her sans banana.

I blended this until smooth.  I feel like the crushed ice helps this process a long, but that might be all in my head.


I top the smoothie off with a swirl of strawberry jelly.  It will pretty much “melt” right in to the smoothie.  I used a jelly which is smooth.  If you use a preserve or jam, it won’t be as smooth.


Peepers loves it! The peanut butter is salty and delicious and the yogurt gives this smoothie sweetness and tang.  Yum!

Isn’t she pretty??  She is growing out her bangs….Such a fashion plate!

As for the empanadas….Do you know what an empanada is?  An empanada is a typically Spanish/Portuguese thing….It is a pastry stuffed with meats or sweet fillings.  They are usually pretty small, you know, hand-held.  I like “stuffed” anything, so I decided to give it a go, for Addy.


I used a canned biscuit for my pastry.  I used big ones…..”Grands”.  They will be rolled out later, so the bigger, the better.

I also used bulk breakfast sausage, diced potatoes, hard boiled eggs, onion and golden raisins which are a typical empanada filling.  For some reason golden raisins are a hit with empanada lovers….they do add a really yummy sweetness that works well in these.

Like I said above, these can easily be made ahead of time, and frozen for easy weekday morning breakfasts.  I will let you know which point to pop these in the freezer.


I started by sautéing the onion and potatoes in a bit of oil. 

I chose potatoes that you get in the fridge section of the grocery store.  They are typically used for hash browns…..you get them by the eggs.  This means I didn’t have to peel or chop any potatoes.  Score.

I sautéed these together for a few minutes, over medium heat.  I also added some salt and smidge of pepper.


Next, I added my sausage and cooked this until the sausage was browned, about 7 more minutes.


Once my sausage mixture cooled a bit, I added it to a bowl that already contained the raisins and hard boiled eggs.  I had smooshed the eggs up with my hands as opposed to chopping them.  I feel that I get the same result with boiled eggs whether I chop of smoosh.  They fall apart no matter what.

I mixed this all up gently.  The filling is ready!  Taste it to check for salt and pepper though.


As for the biscuits, I popped open the can and rolled out each biscuit on a floured board.  I wanted each biscuit about 4 inches across and ¼ an inch in thickness.


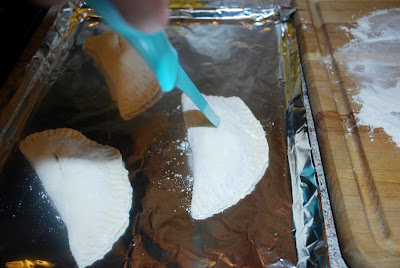
I added a rounded tablespoon of filling to one side of the flattened biscuit.  Then, I folded it over and pinched to seal.


I used a fork to crimp my edges and really make sure they are sealed.

At this point, go ahead and wrap these up individually and freeze them if you are making them ahead of time.  Take one out to defrost in the fridge the night before you want it.  In the am, let it sit on the counter while your oven preheats to let the filling come to room temperature.  Bake as directed below.


Right before I baked these, I cut a slit in the top to let the steam escape.

I baked these according to the biscuit package directions, which was 15 minutes at 350 degrees.


This was as I was pulling them out of the oven.  They smelled so good!  And they are the perfect size for a kid.  They are packed with protein and carbs for energy!


These are such a yummy weekday quick breakfast!  The sausage and eggs work so well together and the raisins are the best part!  They are an unexpected sweet little treat in there!  These are super filling and hearty……An am must!

Addy wouldn’t let me take a picture of her eating it because she wasn’t dressed yet.  Total teenaged girl.  Too bad she is only 7.

PB&J Smoothie

¾ cup crushed ice

½ cup 1% milk

5 ounces vanilla Greek yogurt, light and fat free

2 tablespoons peanut butter, reduced fat

2 tablespoons strawberry jelly

In a blender, blend together ice, milk, yogurt and peanut butter.  Pour into serving glass and swirl in jelly.

Serves 2 kids.


Breakfast Empanadas

1 can “Grands” Biscuits, canned

1/3 cup onion, chopped

1/3 cup potato, peeled and chopped (bagged is best)

½ pound breakfast sausage

1/3 cup golden raisins

3 hard-boiled eggs, chopped

Salt and pepper to taste

Preheat oven to 350 degrees. 

Sauté onions and potatoes over medium heat for about 5 minutes, over medium heat.  Add sausage and cook until sausage is browned, about 7 more minutes.  Season with salt and pepper.

Add cooled sausage mixture to a bowl containing raisins and chopped eggs.  Mix gently.

On a floured board, roll out each biscuit until it is about 4 inches in diameter.  Add 1 tablespoon filling to each biscuit, fold in half and press to seal.  Use a fork to crimp the edges.

Bake at 350 for 15 minutes, or until tops are golden brown.

Makes 10.

Friday, August 24, 2012

Crabbies!


Hi guys!  Happy Friday! 

I can’t believe that kids go back to school on Monday!  This summer flew by.  Don’t get me wrong, I’m happy that they are back to school…..it just seems that summer went quick.  Addy is going to be in third grade and Paisley starts Kindergarten!  Ahhhhh!  I can’t believe my baby is so old;)  She actually doesn’t go back to school until the Tuesday after Labor Day……they start the kindergartners later here. 

Are you wondering what I am going to make for you today?  I actually can’t believe I waited this long to show you this recipe.  What I am going to show you is one of my favorite things ever.  It is an appetizer we like to call “Crabbies”.  Or if you are my BFF Jennifer, you call them Crabby Patties.  I think she watched too much SpongeBob.

My mom started making these about 20 years ago, from what I remember.  They could have been around a lot longer than that, but that isn’t something I would have paid attention too. These are something that my mom made for every dinner party, bridge night and birthday party.  Carol didn’t create this recipe.  From what she can remember, she got the recipe from her friend Judy….But it is one of those things that has gotten hazy as the years have gone by.  Who really knows where this recipe came from.  That’s not what is important.  What is important here is that they are a little bit of heaven.

Oh yeah, they are also ridiculously easy to make.  You will want to start making them for every party too.


For this recipe, I used English Muffins, Old English Cheese Spread, canned crab, butter, lemon juice, garlic salt and Old Bay seasoning.

This might not be the exact recipe that was given to my mom a long time ago.  She can’t remember, and she has never met a recipe that she hasn’t changed.   Usually this works for her….but I do get calls from her from time to time questioning why a recipe didn’t work for her…..even though she changed 75% of the recipe;)  She claims the additions of lemon juice and garlic salt. 

Old English cheese is made by Kraft.  It is usually found by the Velveeta.  It is a sharp cheddar potted cheese.  Yes, it is also a pasteurized cheese product and it is straight out of 1975.  Not really, but it seems like it.  I don’t question it or look for substitutes.  Just follow the recipe.


I started by mixing a stick of softened butter with the Old English Cheese Spread.


Then, I stirred in the lemon juice, garlic salt and crab.  I stirred until combined.

Carol also likes to stir in a smidge of hot sauce too.  Unfortunately, that wasn’t written on the recipe I have and she neglected to tell me about this till after I made them.

Anyhoo, I have never mixed in hot sauce, but it sounds delightful.


Finally, I spread this mixture on English muffin halves.  This will make enough to cover 12 halves or the entire package.

I also sprinkled mine with Old Bay Seasoning before I baked them.  Paprika is nice too.

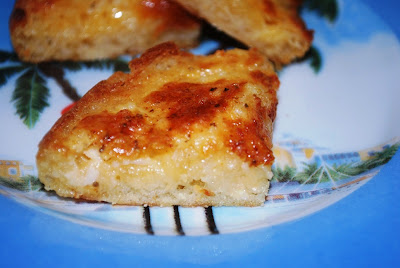
These baked at 425 for about 15 minutes.  Then, I popped them under the broiler until the tops were brown and bubbly.


I cut mine into wedges.  So simple and quick, yet so crazy good.

These remind me of my childhood.


These are such a great appetizer.  They seem to be a real crowd pleaser….even for people that think they don’t like crab.  What wouldn’t be good with a whole stick of butter in it?

I hope you try this recipe sometime.  If you do, you run the risk that Jennifer will come to your house in search of Crabby Patties…..but it is worth the risk;)

Crabbies

1 package English Muffins (6)

4 ounce canned crab, white meat only and drained

5 ounce Old English Cheese Spread

1 stick butter (1/2 cup), softened

¼ teaspoon garlic salt

1 teaspoon lemon juice

Old Bay seasoning to taste

Preheat oven to 425 degrees.

In a mixing bowl, stir together softened butter and cheese spread.  Once combines, stir in crab, lemon juice and garlic salt.

Spread mixture evenly on English muffin halves.  Sprinkle tops with Old Bay.  Bake at 425 for 15 minutes.  Turn oven to “broil” and broil until tops are brown and bubbly.

Cut into wedges.

Makes 48.

Tuesday, August 21, 2012

New Ideas for Fruit Spreads!


Hi guys!  How was your weekend?  Ours was great!  My mom was here, and I always like it when she comes to visit.  We ate a lot, as usual.  We didn’t create any new and exciting recipes though.  It was more like we just ate a lot of Oreos;)

Today I am going to talk a bit about my fruit spreads.  When we set up at Farmer’s Markets, it is always pretty entertaining to listen to people walk by and tell whoever they are with what they think I am selling without slowing down to check.  I usually here “what’s that?”….”I think it’s honey”, or “salsa”, or once we even heard an older gentlemen tell his wife that we were selling peanut butter.  Yep sir…I am selling 9 different kinds of peanut butter!  And some of it is red, like BBQ sauce;)  I guess it would be hard to figure out what I am selling if you don’t slow down to look.

We also here a lot “what do I use this for?” when people are inquiring about the fruit spreads.  I always give the same answer…..”we use is just like a jam or a jelly, but we also heat it up and pour it over ice cream, over pancakes or waffles, or we stir it into oatmeal and yogurt.  I also bake with it!”  I am going to punch myself in the face if I hear myself say that one more time.  I have got to branch out because I am pretty sure I sound like a broken record.

I was thinking of other things I could tell people to do with my fruit spreads.  Obviously, I have a ton of ideas, but I need quick and easy ideas to give people at Farmer’s Markets.  Last night, I tried out 3 different sandwich combinations that all turned out amazing.  I think that telling people that my fruit spreads are great on sandwiches is another really good avenue to try.  Let me show you the sandwiches I made…..and they are all grilled with gooey cheese so that is automatic deliciousness.


My first sandwich combination actually comes from my BFF Jennifer.  She told me that she puts Ginger Pear spread and Cambozola cheese on her hamburgers.  I thought that sounded kind of weird.  But I tried it on a grilled roast beef sandwich and it was ah-may-zing.  The sharp ginger flavor works really well with roast beef and the creamy blue cheese couldn’t be better on this sandwich.


My second combination is extra sharp cheddar cheese, Whiskey Apple Spread and turkey.  I have told you before that I am a fan of apples and cheese together and the addition of turkey to this sandwich makes it crazy good.  This one ended up being my favorite.


My last sandwich combination is Provolone cheese, County Fair Peach spread, Dijon mustard and ham.  Also amazing.


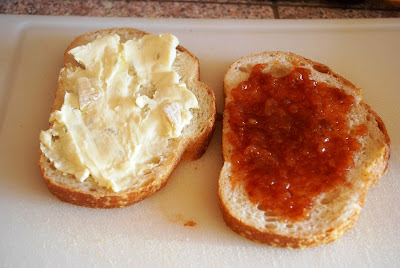
For the peach and ham sandwich, I used a sourdough bread slathered in mustard and peach spread.


I added Provolone and ham and grilled this bad boy.


When you make any kind of grilled sandwich, you have to spread softened butter on each slice of bread…on the outside, obvs.  Don’t take the easy way out and just toss butter in the pan.  Not the same thing.


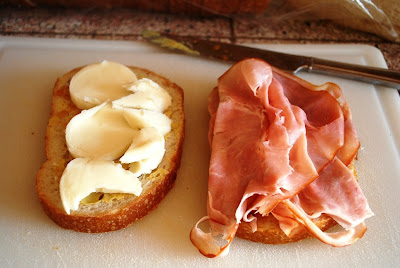
This is a picture of the Cambozola cheese and Ginger Pear spread.  Then, I topped the cheese with roast beef, but I forgot to take a picture of that.  Sue me.


This is the shar cheddar cheese and Whiskey Apple spread.


There goes the turkey!


So like I said above, this one was my favorite.  The sharp cheddar is amazing with Whiskey Apple spread.  I knew I would love Whiskey Apple spread with turkey because last year I basted my Thanksgiving turkey with it.  The flavors are meant to be together.


The roast beef, Ginger Pear spread and Cambozola…..This creamy combination of brie and blue cheese works perfectly with roast beef and Ginger Pear spread.  Jennifer was right.  I will never doubt her again.


And the ham, oh man the ham.  Chris loves this one.  We both loved the peach spread with mustard and the provolone tied it all together. 

You have to try one of these amazing combinations.   And come see me at a Farmer’s Market!  I will have a whole new line to feed everyone about my fruit spreads……until I get sick of this one;)  Eventually I won’t be able to stand the sound of my own voice at all and I will have to pretend I am mute.

See ya on Thursday!

Friday, August 17, 2012

Anchor Steam Burgers!


Good morning!  So I think that I had told you this before….Mr. Rooster’s birthday was August 8th.  He had work that day, I had cheer practice (well, Addy did anyway), and we just didn’t get it together to have a good birthday dinner for him.  I made up for that a few nights ago.  I made him Anchor Steam Burgers.  Chris loves a good cheeseburger, and he loved it even more since it was infused with his favorite beer.  The beer makes the beef super moist.  So moist that I don’t even add anything else to the burgers but salt and pepper.

A couple of months ago, I worked at a food show with some friends of mine who are food brokers.  One of the products that they represent is a Guinness Brat.  It is just as it sounds…..a delicious sausagy bratwurst infused with Guinness beer.  They are crazy good.  I don’t even really care for Guinness, but they were still crazy good.  I wanted to replicate the beer flavor in a hamburger, but I definitely didn’t want said beer to be Guinness…..so I used Anchor Steam, which is Chris’s favorite.  The results were amazing.  Let me show you how I made these little pieces of heaven.


For the burgers (and don’t worry….these get a yummy topping too), I used an Anchor Steam and two types of ground beef.  I used a pound of super lean burger so I won’t be such a fatty, and a pound of a slightly fattier beef for flavor.  Moderation people.


The first step is to reduce the Anchor Steam by half.  And FYI, you can use any beer you want for this….within reason.  Some good beers to use are Anchor Steam, Sierra Nevada Pale Ale or any other Sierra Nevada Beer, Guinness, Sam Adams Boston Lager, or an IPA.  So beers not to use are:

-Coors Light

-Keystone, any variety

-Meisterbrau

-Natural Light

You get the picture.  Basically any beer that I would actually drink (Keystone Ice, baby!) won’t work for this recipe.  I think I am the only Chico State student ever that would be pissed when I walked into a party and they had a keg of Sierra Nevada.  Darker beers are no bueno to drink;)

I boiled the beer for about 10 minutes.  It reduced by half during this time.  It gets thicker and slightly syrupy.


Horrible picture, but you can see that the beer is closer to 6 ounces now than 12 ounces.


I poured 3 ounces of the reduced beer over the beef and let it sit for about 10 minutes.  Believe it or not, the beef will absorb every last drop of the beer.  This gives the beef an amazing flavor.  Beer really goes well with beef.


While my beef soaked, I got started on my onions…..which are the part of the delicious topping.  I sliced a whole onion in half, and then I sliced those up.


I sautéed the onions over low heat for about 45 minutes.  I know, I know….this takes some time.  Probably not the ideal thing to do when you get home from work on a busy weeknight.  But, you can make the onion topping ahead of time and keep it in the fridge until you are ready to make your burgers.  I guess that requires recuing your beer ahead of time too.  I think you can make it work.  I have faith in you and your beer reducing abilities.


I will also be adding Dijon mustard, thyme and the remaining reduced beer to these onions.


Once my onions had cooked for about 45 minutes, and they were soft and sweet, I added the mustard.  I also added the thyme.


Finally, I stirred in the reduced beer.  Be ready for one of the best smells ever.  Your whole house will smell amazing.

I let this reduce for just a couple of minutes.  It will thicken pretty quickly.

Now your onions are done.  You can pop them in the fridge and reheat them later if need be.


Back to the burgers, I formed my patties and fried ‘em up.  You can grill yours if you want.  It was raining at my house so I didn’t go outside.  I always seem to find some excuse to not BBQ;)

That white stuff is cheese;)

Remember to form your patties slightly bigger than your buns.  They will shrink when cooking.  Also, make a dent in the middle with your thumb as burgers tend to puff up in the middle and you will end up with a weird hacky sack burger if you don’t make a dent.

These cooked about 3 minutes per side.  I like my burgers rare.  If you don’t like them bloody, cook them longer.  Duh.


I toasted my buns and added mayo to one side.  Mayo is up to you.  It is a personal preference, I guess.


Holy crap.  This was one of the best burgers I have ever had. The beer makes it.  You can taste it in the meat and of course, in the onion topping. 


I am pretty sure this was the juiciest burger I have even had.

I topped my burgers with gruyere cheese, which is a nutty Swiss cheese.  Cheddar would work too.


I wanted to take another picture, but this was what Chris left me with after about 1 minute.  Needless to say, he loved it.  This will be my only burger recipe from now on.

I hope you try this.  Let me know what beer you used!


Anchor Steam Burgers

2 pounds ground beef, 80/20 and 93/7 mixed

12 ounces Anchor Steam beer

1 teaspoon salt

1 teaspoon black pepper

Oil for frying

Gruyere cheese for topping

Buns, condiments of choice

Pour beer into a sauce pan.  Boil for 10 minutes or until beer is reduced by half.

Pour 3 ounces of reduced beer over ground beef.  Set remaining beer aside.  Let beef sit for 10 minutes. 

Sprinkle beef with salt and pepper and mix.  Form patties and fry burgers in a little bit of oil for about 3 minutes per side, over medium heat.

Top with cheese for last minute or cooking.  Serve on buns with onion topping and condiments of choice.

Makes 6 burgers

Anchor Steam Onion Topping

One large onion, sliced

1 tablespoon butter

2 teaspoons oil

3 ounces reduced Anchor Steam beer, leftover from burger recipe

1 heaping tablespoon Dijon mustard

2 teaspoons fresh thyme

Salt and pepper to taste

Melt butter in oil in a large sauté pan.  Add onions and sauté over low heat for 45 minutes.  Onions will be very soft.

Stir in mustard, thyme and reduced beer.  Cook until reduced and thickened, about 2 more minutes. 

Serve on burgers.

Share